Note: On the 1954-s Cents there are a number of different dies with Die Chips and Die Cracks on the date & mintmark. Check the die markers for a correct match.
The listings on this page are by description / delimitation letter / position letters. Full die breaks at the top and semi die breaks at the bottom of the page. See the Hardy Index System link.
“F+” indicates full breaks that extend both above the highest level and below the lowest level of the letters.
LDB4-1954S-001A 4F+
Images Courtesy of JC Stevens


Die Markers: Obverse – Light Die Crack on Coat.
Reverse – none noted.
Cross references: Cohen 54S-B618, Hardy 54S-4F+. 07/16/2015
#1 of 5 stage progression.
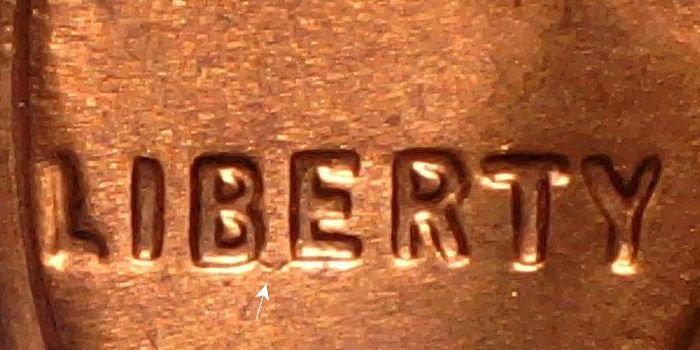
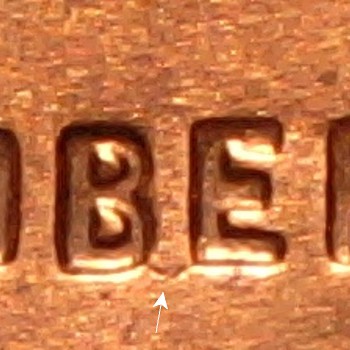
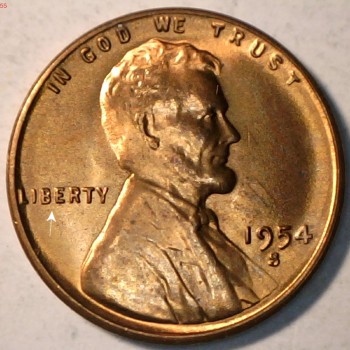
LDB4-1954S-001B 4F+
Images Courtesy of JC Stevens


Die Markers: Obverse – Die Break Coat, Die Chip T in LIBERTY, Long Neck 5
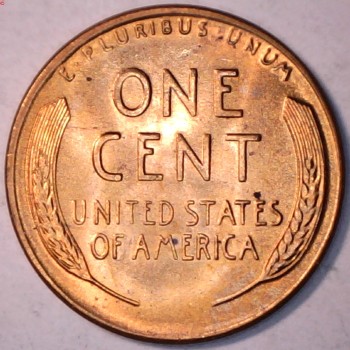
Reverse – Die Chip T in CENT.
Cross references: Cohen Pre 54S-B622, Hardy 54S-4F+1. 11/23/2015.
#2 of 5 stage progression.
LDB4-1954S-001C 4F+

Die Markers: Obverse – die crack and chip from the 5 digit in the date.
Reverse – Die Chip T in CENT.
Cross references: Cohen Pre 54S-B624, Hardy 54S-4F+1. 11/23/2015.
#3 of 5 stage progression.
LDB4-1954S-001D 4F+
Images Courtesy of Louis A. West


Die Markers: Obverse – die crack and chip from the 5 digit in the date. Die Crack on coat is larger.
Reverse – Die chips on left wheat & “T” in CENT.
Cross references: Cohen Pre 54S-B624, Hardy 54S-4F+1. 05/22/2017.
#4 of 5 stage progression.
Note: Stage 5 will have a crack between the 9 & 5 in the date.
LDB4-1954S-002 4F+
Images Courtesy of Richard Stachowski


Die Markers: Obverse – die crack 5 “Long -Backed 5”
Reverse – none noted.
Cross references: Cohen 54S-B618, Hardy 54S-4F+14. 07/13/2015.
LDB4-1954S-004 4F+
Images Courtesy of John Smith


Die Markers: Obverse – die crack 5 “Long -Backed 5”, Die Crack on 9 in DATE.
Reverse – None Noted.
Cross references: Cohen 54S-B624, Hardy 54S-4F+. 08/13/2015.
LDB4-1954S-008 4F+
Images Courtesy of Earl M. Williams


Die Markers: Obverse – None Noted.
Reverse – None Noted.
Cross references: Cohen Not Listed, Hardy 54S-4F+. 07/17/2017.
“FL+” indicates full breaks that extend below the lowest level of the letters.
LDB4-1954S-003A 4FL+
Images Courtesy of Juan Aguerre


Die Markers: Obverse – Check Mint Mark position.
Reverse – None Noted.
Cross references: Cohen 54S-B503, Hardy 54S-4FL+. 07/17/2015
#1 of 4 stage progression.
Stage 1, Cohen 54S-B503 Top of Die Chip is jagged.
Stage 2, Cohen 54S-B504 Die Chips on 5 & 9 of Date.
Images are needed of the following stages.
Stage 3, Cohen 54S-B505 Small die Chip on Right Wheat.
Stage 4, Cohen 54S-B506 Full BIE (Larger Die Chip)
LDB4-1954S-003B 4FL+
Images Courtesy of JC Stevens


Die Markers: Obverse – Die Chip on 9 & 5 on Date, Check Mint Mark position.
Reverse – None Noted.
Cross references: Cohen 54S-B504, Hardy 54S-4FL+. 02/23/2016.
#2 of 4 stage progression.
LDB4-1954S-006 4FL+
Images Courtesy of JC Stevens


Die Markers: Obverse – Check Mint Mark position.
Reverse – None Noted.
Cross references: Cohen Not Listed, Hardy 54S-4FL+. 02/23/2016.
“EL+” indicates a break of ¾ that extend below the lowest level of the letters.
LDB4-1954S-007B 4EL+
Images Courtesy of Jason Dick


Die Markers: Obverse – Full die Chip top of 9.
Reverse – Die Crack Right Wheat to Rim.
Cross references: Cohen 54S-B103, Hardy 54S-4EL+. 04/04/2022.
#2of 3 stage progression.
Images are needed for stages #1.
Stage 1, Cohen 57-BA102 SOME fill “Die Chip” on 9, Die Crack Right Wheat to Rim
Stage 2, Cohen 57-BA103 Die Chip between “B & E” still not full. Die chip in 9 is full.
Stage 3, Cohen 57-B407 Die Chip “BIE” is now full, Die Chip base of 9.
LDB4-1954S-007C 4EL+
Images Courtesy of Juan Aguerre


Die Markers: Obverse – Small Die Chip Base of 9, Full die Chip top of 9.
Reverse – Die Crack Right Wheat to Rim.
Cross references: Cohen 54S-B407, Hardy 54S-4EL+. 09/21/2016.
#3 of 3 stage progression.
Images are needed for stages #1.
Stage 1, Cohen 57-BA102 SOME fill “Die Chip” on 9, Die Chip base of 9, Die Crack Right Wheat to Rim
Stage 2, Cohen 57-BA103 Die Chip between “B & E” still not full. Die chip in 9 is full.
Stage 3, Cohen 57-B407 Die Chip “BIE” is now full, Die Chip base of 9.
“BL” indicates a break of less than ¼ the height of the letters “lower” die break.
“S” indicates a semi die break.
LDB4-1954S-009 4SBL
Images Courtesy of JC Stevens


Die Markers: Obverse – Die Crack from the stem on the 5 in the date.
Reverse – None Noted.
Cross references: Cohen 54S-BA204, Hardy 54S-4SBL. 11/17/2017.
“BL+” indicates a break of less than ¼ the height of the letters that extend below the lowest level of the letters.
LDB4-1954S-005A 4BL+
Images Courtesy of Jason Dick


Die Markers: Obverse – RPM
Reverse – None Noted.
Cross references: Cohen noted not listed, Hardy 54S-4BL and CONECA 1954-S RPM-004. 04/04/2022..
#1 of 11 stage progression.
LDB4-1954S-005K 4BL+
Images Courtesy of JC Stevens


Die Markers: Die Crack on 9 in DATE, RPM
Reverse – None Noted.
Cross references: Cohen 54S-B206, Hardy 54S-4BL+3 and CONECA 1954-S RPM-004 stage K. 11/07/2017.
#11 of 11 stage progression.
Note: Cohen has a list of her Stages 1 through 6 in the Double Mint Mark listing as 54S-DM1 to 54S-DM5 and 54S-BA206a & 54S-B206b. Reverse die changed with Stage I.
LDB4-1954S-0010 4BL+
Images Courtesy of Juan Aguerre
Die Markers: None Noted.
Cross references: Cohen 54S-BA-1003, Hardy NL. 02/26/2025.
Return to Lincoln Cent Die Breaks Called “BIE”